What's new in Swift Release 25 in June?
The June 2025 release is focused on bridging the gap between powerful data and an effortless user experience.
Read on to discover the highlights of this release and unlock new possibilities for your app automation journey.
Swift Release 25 – June features the following capabilities:
Soft Delete in Swift Objects – Deleted Swift Objects now go to the Recycle Bin, so you can restore them anytime.
Reload the FBF when Direct Action Performed – Execute a direct action on FBF and instantly see the results with list reloading.
Populate Grid View with JDE Orchestration Data – Populate grids instantly with JDE Orchestration data at the click of a button.
Sort Columns on “Enable Search” Feature – Allows sorting of columns within the Enable Search popup. Designers can also configure which column should appear first in the list.
CSV/Excel Grid Import – Populate entire grids instantly with a simple spreadsheet upload.
Search & Export Workflow Logs – Find and export logs faster with advanced filters and one-click downloads.
Import Data on Swift Object – Import Excel/CSV data straight into Swift Objects.
So without further ado, let’s dive into the exciting new features we recently released!
Introducing Soft Delete
With this release, when you delete a Swift Object, it will automatically go to the Recycle Bin instead of being permanently removed.
How It Works
Soft Delete.mp4Go to Swift Objects → Actions → Recycle Bin.
Find your object and click Restore.
That's it!
Your object will be instantly restored to your Swift Objects list, exactly where it was before.
Reload the FBF when Direct Action Performed
With this release, the FBF will automatically reload whenever a user performs a direct action on the form. This ensures the list is refreshed immediately after the action is successfully completed.
How to Enable
You can set this up in just a few clicks when configuring your actions.
Execute Direct Action with List Reload.mp4When configuring a direct action on a Find or Browse form, enable the Execute Direct Action option.
In the configuration popup that appears, select your desired Swift Flow and set up its fields.
You will also see the checkbox: Reload List Form. Make sure to enable it.
Save your configuration.
Now, whenever a user triggers this direct action, the list will automatically refresh upon successful execution, showing them the most up-to-date information instantly.
Populate Grids with JDE Orchestration Data
With this release, We've enhanced our Grid View component to allow you to populate it dynamically with data from a JDE Orchestration. With the click of a button, you can now call an orchestration and map its response directly into a grid view component, creating a seamless and efficient user experience.
How to Map a JDE Orchestration Response to a Grid
This process involves two main parts - preparing your grid to receive data and configuring the button to fetch and map it.
Prepare Your Grid:
Click the Edit icon on your Grid View component.
Find and enable the Response Mapping toggle. This tells the grid it's ready to accept data from an action.
Configure the Trigger Button:
Click the Edit icon on the button you'll use to call the orchestration (e.g., a "Fetch Orders" button).
In the button's settings, locate the dropdown for mapping form fields and select the Grid option. This links the button's action to your grid.
Define the Response Mapping:
This is where you connect the dots. A new section will appear, allowing you to map the fields from the JDE Orchestration response to the specific columns in your grid.
Result:
Once Click the button → Orchestration runs → Grid updates instantly with retrieved data.
Enhanced “Enable Search” Feature
With this release, business analysts and admins can now customize the sorting behavior for the "Enable Search" functionality in Tags, Text Input, and other components. Previously, the column sorting followed Swift’s default behavior. Designers can now configure which column appears first in the list view.
How to Set It Up
Customizable Search Columns.mp4Enable Search – Turn on the search feature in your form.
Configure Columns – Click the gear icon to customize:
Configure the Searching List by adding the JDE details.
Reorganize columns (drag & drop to prioritize key fields).
That's all it takes. You've now created a custom search view that puts the most important information front and center.
Populate Grids Instantly with CSV File Import
With this release, business analysts and admins can enable an option for users to prepare their data in a spreadsheet and upload it in a single click, populating the entire grid instantly.
How to Enable CSV Import on a Grid
Activating this feature is incredibly simple.
Populate Grids.mp4Navigate to the form containing the Grid View you want to configure.
Click the Edit icon on the Grid View component to open its settings.
Make the grid Editable.
Find the CSV Data Import toggle and switch it on.
An import button now appears at the top of the grid view in the end-user app. Users can download the required template to import data easily.
Search/Export Workflow Logs
In this release, we've introduced a powerful enhancement to the Workflow Logs —making it much easier for Admins and Business Analysts to search and filter logs based on specific data points across different stages of the workflow.
Users can now perform advanced searches using three log categories:
Incoming Data - Search logs based on incoming payloads sent to the workflow.
Example: Find logs where the "name" field in the incoming JSON is "Alex".Request - Filter based on the data sent in requests to third-party systems.
Example: Search for a request where the login user ID is "Alex.cooper".Output - Locate logs based on responses received from third-party systems.
Example: Search for responses that include a "warning" message.
How to Configure and Use Log Search
Users can define a custom JSON template for each of the above categories by selecting relevant JSON keys. Once defined, these keys become available under the Labels dropdown in the Search Log interface.
Simply choose a label, select an operator (e.g., =, contains, etc.), and enter the value to filter logs accordingly.
Example: Name = Alex
Part 1: Making Your Data Searchable
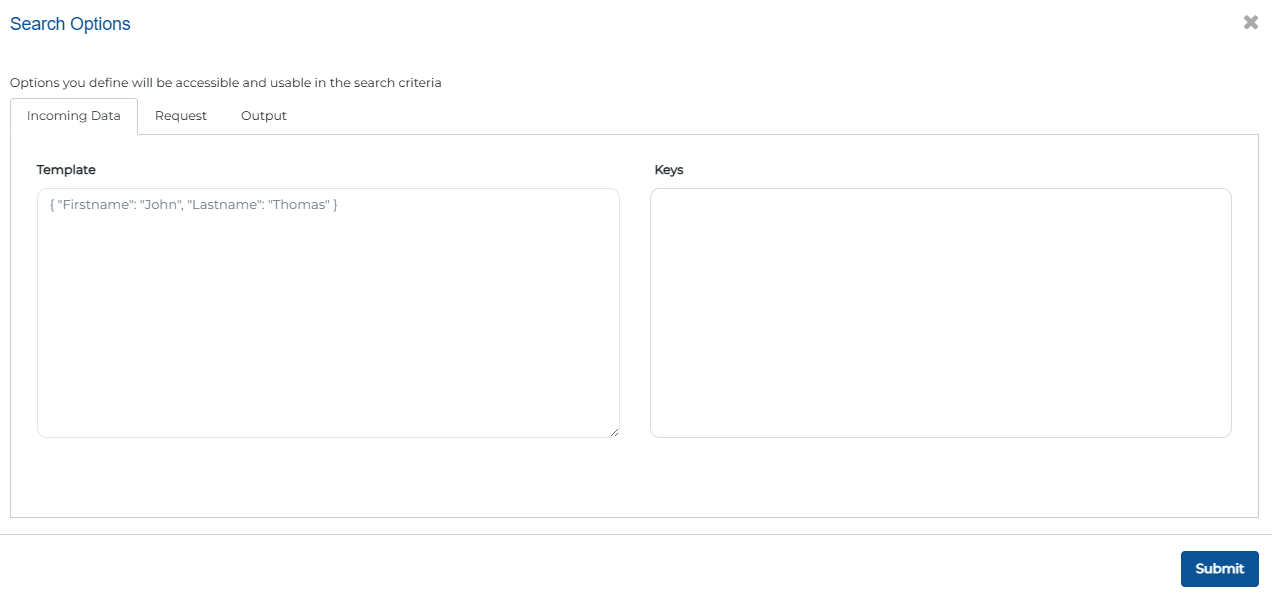
Navigate to the view logs option on the workflow you want to configure.
Here, you can simply specify which fields from the Incoming Data, Request, and Output you want to make available for searching.
Click on submit.
Part 2: Using the Advanced Search and Export
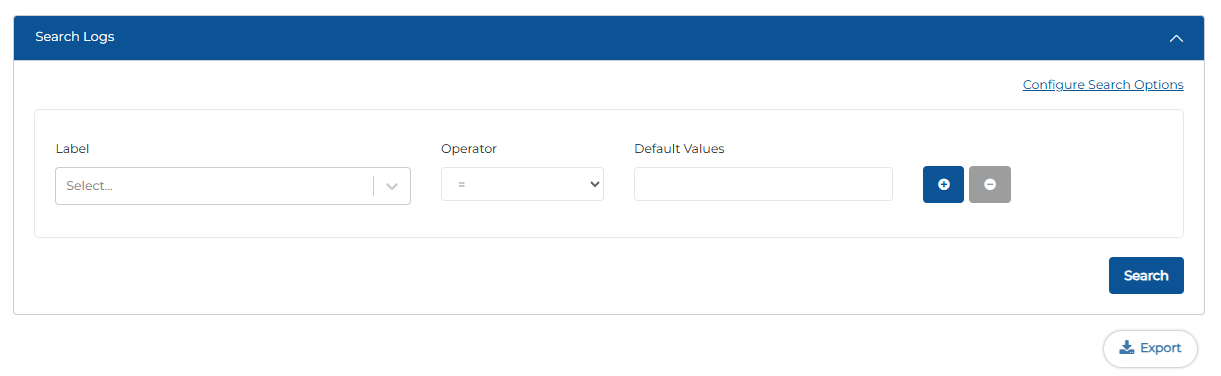
Once the fields are enabled, anyone can use those to filter logs.
Go back to the Search Logs.
In the search area, you can now directly filter through:
Select Field
Select Operator
Enter Value
After running the search, you can click the Export button to download the precisely filtered results for your records or for further analysis.
Import Data on Swift Object from End User App
With this release, users can directly import data from an Excel file into a Swift Object, using the end user app.
How to Enable Data Import on Your Form
You can add this functionality to any Entry Form by following these steps:
Direct Data Import.mp4Add the File Upload Component
- In your form builder, open an Entry Form.
- Drag and drop the File Upload component onto your form.
Configure the Destination
- Click to edit the File Upload component. In the configuration panel, and select the Swift Object.
Map Your Data
- A Data Mapping interface will appear automatically. This is where you connect the columns from the spreadsheet to the fields in your Swift Object.
Close and publish.
The End-User Experience

Once you’re done, users will see a clean Import button. Next to it, we automatically provide a Download Template link. This gives users a pre-formatted spreadsheet with the correct column headers, ensuring their uploads work perfectly on the first try.
Wrapping Up
That wraps up our latest updates to Swift!
These features aren't just tools, they're your shortcuts to building apps that are smarter, tougher, and way easier to use. Now you can keep data safe and make forms pop with live updates, all under your control.
📌 Pro Tip: Combine the new Direct Action with List Reload with Grid Rules and Customizable Search to create a truly seamless, end-to-end workflow for your users.
Stay tuned for more innovations, and as always, happy designing with Swift!
Thank you for being a part of the Swift community. Here's to optimizing your processes and achieving success!
With 💙 from Swift
Your feedback is essential in driving us forward, so please don't hesitate to share your thoughts with us, and stay tuned for more groundbreaking features as we evolve!